Grafting also saves you waiting time. When you plant a new tree, it will take it a few years to start producing a nice amount of fruit for you. When you graft onto an existing tree you’ll have fruit ready for picking in just a couple short seasons. Grafting can also save a sick or broken tree. You will see this in the tutorial below. What we did is used the trunk and roots of a tree that was not producing anymore to support a new tree.
Another benefit for grafting is fighting insects and diseases. If your tree is suffering but you know of another variety that is doing much better in your area, you can graft the new variety on your tree to help it produce better. Also, some trees have a female and a male tree and you have to plant both in order for them to pollinate each other and produce fruit – this is called cross-pollination. Pears, plums, and pecans are among the trees in this group. So in this case, you can graft a female on a male or a male on a female and you will have one tree that can pollinate itself.
Attaching the Scion to the Rootstock
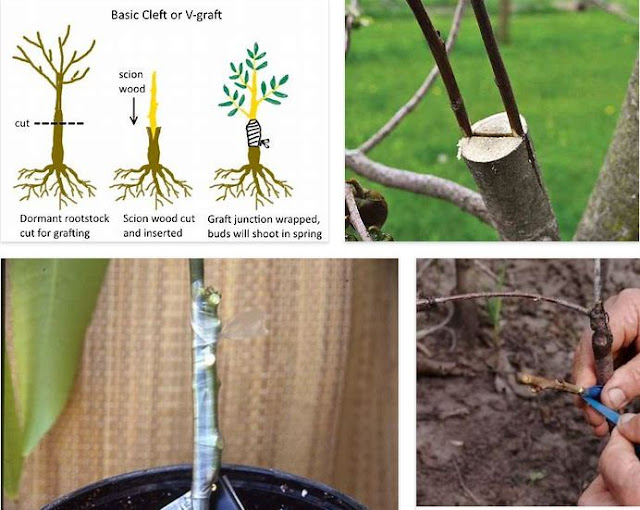
Cut back the rootstock to between 15-30cm – too low a graft union invites pathogen risk from splash back from the soil. Too high, especially on dwarfing rootstock can make for a weak union.
The ends of each joining piece should be cut in matching clean elliptical slices so that when joined together, as much of the cambium layer (the part of the wood between the outer bark and the woody bit) as possible is touching. This may take some practice!
Leave a small ‘church window’ of internal scion wood sticking over the top of the rootstock wood to help with callusing.
Putting horticultural wax on the open cuts will help prevent water loss.
Bud Grafting

For bud grafting, look for a plump, healthy looking bud from the outside/sunny side of the tree that is not dry and shrivelled or with obvious damage to create your scion.
Using a grafting knife, cut a small slit into the bark ½ an inch underneath the bud and slowly pull the knife upwards taking in the cambium layer and outer bark without cutting into the heartwood, or inner part of the branch. End the slice ½ an inch above the bud, so it comes away neatly.
Cut a 1 inch vertical slit into the branch where the bud will be placed, cutting only into the bark layer. At the top of this incision, cut a cross-wise slit, creating a T-shape.
Then, gently lifting the corners where they meet, slide in the scion bud with the growing tip pointing upwards, ensuring that the cambium layers on each are touching.
Wrap the join in grafting tape to keep dry and in the following spring prune off the tip of the branch as soon as the grafted bud begins to grow.
How To Use Pruner

Step 1: Hold the grafting stock in the grafting tool and squeeze the handle to make the cut, repeat this step to cut stem from the donor plant. Take care to ensure that the groove is cut in the stock plant.
Step 2: Slide the donor stem into the groove of the stock plant, matching the cut surfaces as closely as possible. If the stock and donor plant are not the same size, match on the side only.
Step 3: Place sterilizing material around the joint, and bind with tape, the sterilizing material will protect against bacteria and weather conditions.
Step 4: Use the pruner to cut useless branches from the plant.
Step 5: The blade and the end of blade both can cut, one piece blade can be used as two pieces blade, so you would have total six pieces blade.